
Air conditioning is essential in Florida. It’s a good idea to include AC system maintenance as a regular part of your home upkeep. Cleaning your AC coils is an easy way to maximize your AC’s efficiency and extend its lifespan.
Clean your air conditioner coils at least once a year.
What Are AC Coils?
There are two types of coils that need cleaning: condenser coils (outdoors) and evaporator coils (indoors).
The coils in the condenser unit, located outdoors, can get clogged with leaves, dirt, pollen, and other outdoor contaminants. The good news is that it can be hosed down gently.
The evaporator coils, in the air handler unit inside your house, can get dirtied by dust, animal fur and dander, hair, mold, and other indoor contaminants. You won’t be able to spray it down with water like the condenser coils.
Why Clean AC Coils?
- It improves your AC’s cooling efficiency and saves you money. Dirty coils make your fan and compressors have to work overtime. Clean AC coils reduce energy consumption, which saves you money.
- It reduces wear-and-tear on your AC system. Air conditioners with dirty coils have to cycle on more frequently to reach your thermostat temp. The condenser’s fan has to work harder to remove hot indoor air, wearing it down faster than necessary.
- It reduces HVAC service calls. Dirty coils can lead to additional maintenance or repair needs. A cleaner AC unit is a healthier AC unit.
Signs That Your Coils Need Cleaning
- Reduced airflow – If you notice that your AC is not blowing enough cool air, then it’s likely that your coils are dirty and need cleaning.
- Decreased cooling performance – If your AC is not cooling your home like it used to, there’s a high chance your coils are dirty.
- Higher energy bills without higher usage – If you’re paying more without any significant changes in usage, then it’s time to check your AC coils.
What You’ll Need
You can get these supplies at any hardware store or online.
- 2 cans of foaming AC condenser coil cleaner
- Gloves
- Safety equipment (see next section, “SAFETY FIRST”)
- Cordless drill or screwdriver
- Nylon brush
- HVAC fin comb
- Wet/dry vacuum with extender arm
- Garden hose with spray head
- Flashlight
SAFETY FIRST
When Using Chemical Coil Cleaners
- Always follow label instructions.
- Protect your eyes and skin. Use safety glasses, a face shield, chemical-resistant gloves, and chemical-resistant clothing.
- Make sure you have adequate ventilation. If necessary, use a NIOSH-approved filtering facepiece respirator.
To Reduce the Risk of Electrical Shock
The condenser unit of an AC system is highly charged. Make sure that electricity is completely disabled before working on the condenser.
Step-by-Step Guide to Cleaning AC Coils
Cleaning AC CONDENSER Coils
Step 1: Disable electrical power at your breaker box. Turning the AC off at your thermostat will not cut electricity to the condenser.
Step 2: Remove the screws then remove the top cover of the condenser unit. Keep screws together in a safe place. Do the same for the side covers/grilles.
Step 3: If possible, remove the condenser fan assembly. Remove the screws holding the fan and motor assembly in place. If the wiring harness can be disconnected from the condenser unit, disconnect it then lift out the detached fan assembly and wires. If the wires cannot be disconnected, set the detached fan assembly on a stool next to the unit.
Step 4: With your gloves on, remove debris from inside the unit. Clean out the leaves, soil, pebbles, grass, and other debris. This is a good time to check for any loose wires, corrosion, or cracked parts. If you notice anything that needs repair, call your AC repair service technician.
Step 5: Use the wet/dry shop vac to clean out the rest of the debris. You may need an extension arm to reach the bottom.
Step 6: Using an HVAC fin comb, do your best to straighten out the soft aluminum fins on the unit. They won’t return to factory new condition, but any efforts to make them straighter will improve AC unit efficiency.
Step 7: Clean the outside of the AC unit. You’ll need to remove leaves and other debris that get trapped in the grille and fins.
Step 8: Shine a flashlight through the fins from the inside of the unit. This can help you find any areas that need additional cleaning.
Step 9: Inside the unit, spray foam coil cleaner on all four walls of the unit. Let the foam work itself through the fins. Avoid touching the fins and coils as the cleaner does its work. Leave the cleaner on for 5–10 minutes to let it penetrate the dirt and grime.
Step 10: Gently spray the inside with your hose spray. Work your way from top to bottom, from wall to wall. Be careful not to bend the fins with too strong (narrow) a spray.
Step 11: Gently spray the outside of the unit, with a wide spray pointing downwards. Be careful not to angle the hose in a way that pushes debris back into the unit.
Step 12: Let the unit completely dry. Keep it powered off. Once dry, reassemble the unit, then turn the system back on.
Keeping nearby trees neatly trimmed and using a mesh leaf guard can help keep your condenser unit clean.
Cleaning AC EVAPORATOR Coils
Step 1: Disable electrical power at your breaker box. Turning the AC off at your thermostat will not cut electricity.
Step 2: Remove the access panel screws on the indoor unit. You should see the A-shaped evaporator coil assembly.
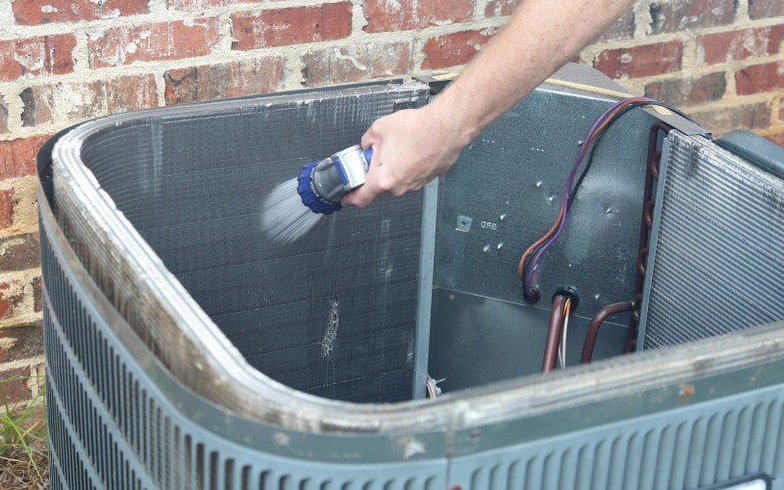
Step 3: Use a soft nylon brush to remove any visible debris or dirt on the surface. Gently brush the aluminum fins to clear debris. Starting at the top and working your way downward, clean the coils without damaging the fins. Vacuum the debris that falls to the bottom.
Step 4: Straighten any flat fins as best you can with the HVAC fin comb.
Step 5: Spray foam coil cleaner onto the entire surface of the evaporator coil assembly. Leave the cleaner on for 5–10 minutes to let it penetrate the dirt and grime.
Step 6: After the cleaner has had time to work, use a wet/dry vacuum to remove any dirt or debris that has been dislodged from the coil. You can use water in a spray bottle to rinse the coils, using the vacuum to remove excess water. Be careful not to over-wet the unit.
Step 7: Leave the access panel open until the coils are completely dry. Then, reassemble the unit then power it back on at the breaker box.
Common Mistakes to Avoid
- Don’t use high-pressure water to clean AC coils, as this can bend the fins.
- Don’t use non-HVAC cleaners. Find a foaming coil cleaner made for HVAC systems. Using acidic cleaners can corrode and permanently damage coils.
- Don’t clean AC coils yourself if you’re unsure. There’s no reason to risk damaging your AC system. Call your HVAC professional instead for AC system maintenance.
Preventive Maintenance is Easy and Cheap
Regularly changing your AC filter is the best and most cost-effective way of keeping your coils clean. A dirty filter causes dirt and debris to accumulate on the coils.
When to Seek Professional AC Coil Cleaning Services
Do you have a more complex AC system?
Not sure you can clean coils without damaging your system?
Don’t feel like doing it?
All of these are valid reasons to call in the pros. Professional HVAC services can ensure that your AC coils are cleaned thoroughly and safely.